

Tip of the Month
NIK Efex HDR Pro for High Contrast Images
February 2011
.jpg)
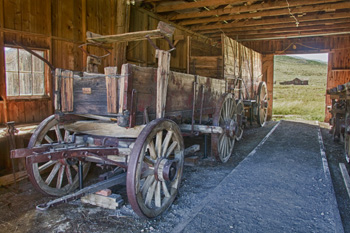
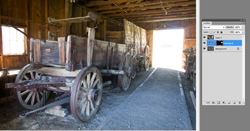
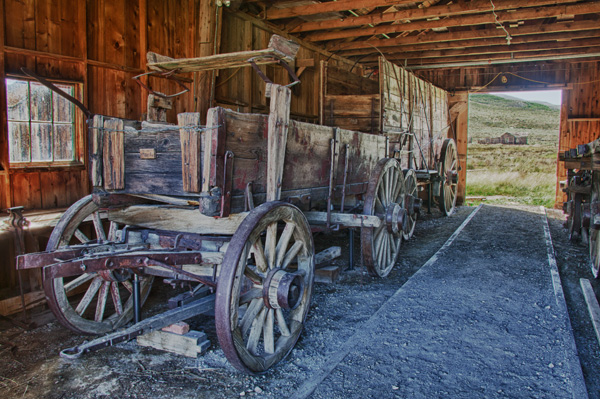
The finished composite, using NIK HDR Efexs Pro and a little Photoshop
Before you read on, Gary Farber from Hunt's Photo is offering a special on
HDR Efexs at a special price of $139.99 (reg. $144.95) - contact Gary at digitalguygary@wbhunt.com
HDR, High Dynamic Range, has become something of a photography rage. For those not yet in the loop, HDR refers to images that have a large, or even huge, degree of contrast, that is, a large range of exposure between the light area and the dark areas. Our eyes and brain process these images naturally, instantaneously compensating for the darks, or the lights, as we direct our attention to that area. Images, however, capture everything at once, and in the capture, then, one is left with this contrast. In the old film days, this was addressed, somewhat, by the use of Neutral Density Filters. With Photoshop, historically, it was most often dealt with by the use of multiple image layers and using Masks to merge the different exposure areas.
Now, various HDR programs do this automatically, and NIK's new Efex HDR Pro program has received a lot of buzz and excitement. Here's my first attempt, accomplished by simply following the screen prompts, and without using their on-line video tutorials. Which means ... it is pretty darn easy to use!
Here's the two images that make up this composite:


You can see that there was a HUGE disparity in the two exposures, far more than is normal or recommended for HDR with just two shots. Normally, a scene like this might use five or seven images, spaced at half or full stop intervals. Nonetheless, I had just two to work with.
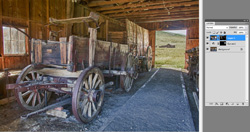
The finished composite, straight out of NIK looked like this:
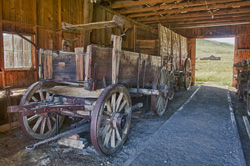
There are multiple preset choices in the HDR program, with thumbnail renditions of what that effect would be. At the bottom of this lesson I illustrate another example, where I used 8 different images, the usual method to do an HDR. In this case, however, using just two images I chose the HDR rendition that I liked the most, and hit OK. The finished image, in this case, had the field behind the open doorway too bright to my taste, and the distant wall and interior walls were more detailed than I liked, giving it an artificial look.
I'm certain that I could have addressed these issues with the HDR program with further experimenting, but I chose to jump to Photoshop to finish it up. However, if you continue to the bottom of this post you'll see two examples where I indeed did use Efex HDR to do all of my adjustments, and the results, you'll see, were pretty incredible.
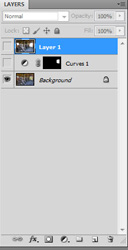
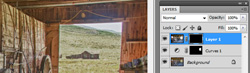
Above, I've shown the Layers Palette, which the Visibility Icon off for the two layers that I eventually used. In the first layer above the Background Layer I did a Curves layer, and pulled down the middle tone value to darken the entire scene. Since a Layer Mask is automatically made, I inversed the mask to fill with Black, and then painted in the doorway with White to reveal the darkened meadow.
I was a bit bothered by the detail in the wooden wall beside the opened door, as the original capture was shiny and reflective, and the HDR provided more detail than I wished. So I dragged the original capture onto the HDR image, holding Shift as I dragged to make sure I had perfect registry.
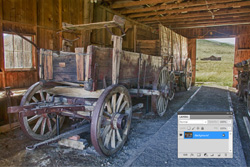
You can see the shiny wall and, if you look
at the wall to the left of the doorway you can see it is shiny. If you look real close, you can see that the third layer is visible, although the second layer is 'active'. Thus, the third layer, with the shiny look is hiding the rest of the image. This calls for a Mask!
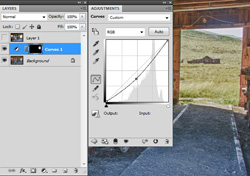
Here's a closeup of that area, and you'll note that the Mask is Black, so the whole upper layer is now hidden. I'm going to paint in the shine I want on the wall to the right, painting with White.
I've painted the shiny wall in with white, as well as
some of the walls above the front of the wagon, near the little window. I used a 30% opacity on my Brush, and painted some areas two times to get the desired effect.To give you an idea of the masking, here's a screen capture of the Mask alone:
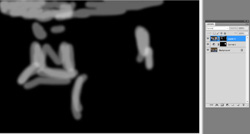
The mask is not black and white but black and shades of gray, so that the top layer's image areas are only subtlely introduced, blending the two layers into one:
When finished I flattened the image into one layer, which I saved, and here's the finished image once again:
Pretty darn incredible for my first attempt, and with only two very extreme exposures to work with. I can't wait to try this with a properly shot HDR sequence, but for this, I thought I'd push the envelope to see how impressive this Plug-in can be. Oh, if you're shy on Plug-ins, as I once was, these load automatically into Photoshop if you follow the prompts, so they're a snap to load.
Here's the same image
where I used 7 images, covering the exposure gaps that the above example originally had. For this one, however, I ONLY used Efex HDR, and targeted some adjustments in that program. Doing so, it eliminated the need for Photoshop Masks, and was actually a lot easier and faster to use, than the method shown above.
Below, I've illustrated a couple of the points I made above. The long image on the Right is a screen shot of a few of the choices that HDR Efex gives for preset options. On the Left, are the eight images I used for the composite taken at about .6 stops apart. The large image on the bottom is the finished composite -- all NIK HDR Effexs, no Photoshop. I tweaked the results with the menu bar offered inside the filter, and was pleased with the result.
.jpg)
.jpg)
.jpg)
If any of this new, exciting material intrigues you, we'll be teaching this, and more, in two Photoshop Classes this summer. One, our Photoshop 1 - Intro to Photoshop, will cover all the basics that a digital photographer needs to know, as well as exciting plug-ins and accessories like NIK and Helicon Focus. Our other offering, taught by author Ellen Anon, takes Photoshop and your creative photography to the next step, and this program is tailored for those who already have experience with Photoshop but who would like to maximize their image, or their vision's, potential. NIK software will play a big role in this course!
If time permits, I'll also be demonstrating this HDR program to our Digital Complete Nature Photo Course, but we'll be covering so much in this course that I suspect the demo will be limited to just that.
Check out this incredible program for yourself – you can download a free trial by visiting the Nik website.
Gary Farber at Hunt's Photo and Video is offering our readers a special price of $139.99 plus free shipping. Mention the code name Hoothollow. Call Gary at 781 462-2332, or email Gary at digitalguygary@wbhunt.com.
Previous Tips, July 2009 onward
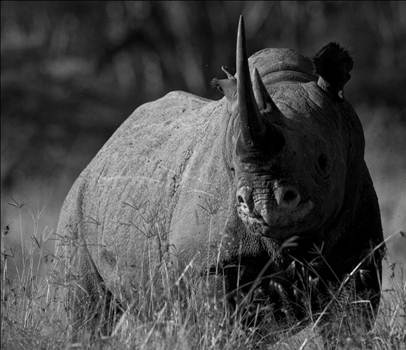
Silver Efex Pro for Black and White Images
Beware the DELL Software Solution Rip Off
How and What We Pack for Trips
Canon Digital Learning Center
The Movie Mode with the Canon Mark IV
Batch Renaming in Bridge and CS5
Alternate Uses of some Bogen Products
Hoodman Products
Using High ISO and Live View for Focusing in Dim Light
Art Print Scams for Hungry Photographers
Hungry Vultures ruin vehicles in the Everglades
Use a Short Lens for Depth of Field
Get Professional Help!
Mini-Molar Bag
Access America Trip Insurance
Bogen Base for Macro Work
Archived Tips of the Month
prior to July 2009
Most of my original Tips of the Month for the last several
years are available through this link. The 'look' is from my
original web site, although if I ever have enough time I might redo these pages to match the new web site But that's not a high priority.
Tip of the Month
NIK Efex HDR Pro for High Contrast Images
February 2011
The finished composite, using NIK HDR Efexs Pro and a little Photoshop
Before you read on, Gary Farber from Hunt's Photo is offering a special on
HDR Efexs at a special price of $139.99 (reg. $144.95) - contact Gary at digitalguygary@wbhunt.com
HDR, High Dynamic Range, has become something of a photography rage. For those not yet in the loop, HDR refers to images that have a large, or even huge, degree of contrast, that is, a large range of exposure between the light area and the dark areas. Our eyes and brain process these images naturally, instantaneously compensating for the darks, or the lights, as we direct our attention to that area. Images, however, capture everything at once, and in the capture, then, one is left with this contrast. In the old film days, this was addressed, somewhat, by the use of Neutral Density Filters. With Photoshop, historically, it was most often dealt with by the use of multiple image layers and using Masks to merge the different exposure areas.
Now, various HDR programs do this automatically, and NIK's new Efex HDR Pro program has received a lot of buzz and excitement. Here's my first attempt, accomplished by simply following the screen prompts, and without using their on-line video tutorials. Which means ... it is pretty darn easy to use!
Here's the two images that make up this composite:
You can see that there was a HUGE disparity in the two exposures, far more than is normal or recommended for HDR with just two shots. Normally, a scene like this might use five or seven images, spaced at half or full stop intervals. Nonetheless, I had just two to work with.
The finished composite, straight out of NIK looked like this:
There are multiple preset choices in the HDR program, with thumbnail renditions of what that effect would be. At the bottom of this lesson I illustrate another example, where I used 8 different images, the usual method to do an HDR. In this case, however, using just two images I chose the HDR rendition that I liked the most, and hit OK. The finished image, in this case, had the field behind the open doorway too bright to my taste, and the distant wall and interior walls were more detailed than I liked, giving it an artificial look.
I'm certain that I could have addressed these issues with the HDR program with further experimenting, but I chose to jump to Photoshop to finish it up. However, if you continue to the bottom of this post you'll see two examples where I indeed did use Efex HDR to do all of my adjustments, and the results, you'll see, were pretty incredible.
Above, I've shown the Layers Palette, which the Visibility Icon off for the two layers that I eventually used. In the first layer above the Background Layer I did a Curves layer, and pulled down the middle tone value to darken the entire scene. Since a Layer Mask is automatically made, I inversed the mask to fill with Black, and then painted in the doorway with White to reveal the darkened meadow.
I was a bit bothered by the detail in the wooden wall beside the opened door, as the original capture was shiny and reflective, and the HDR provided more detail than I wished. So I dragged the original capture onto the HDR image, holding Shift as I dragged to make sure I had perfect registry.
You can see the shiny wall and, if you look
at the wall to the left of the doorway you can see it is shiny. If you look real close, you can see that the third layer is visible, although the second layer is 'active'. Thus, the third layer, with the shiny look is hiding the rest of the image. This calls for a Mask!
Here's a closeup of that area, and you'll note that the Mask is Black, so the whole upper layer is now hidden. I'm going to paint in the shine I want on the wall to the right, painting with White.
I've painted the shiny wall in with white, as well as
some of the walls above the front of the wagon, near the little window. I used a 30% opacity on my Brush, and painted some areas two times to get the desired effect.To give you an idea of the masking, here's a screen capture of the Mask alone:
The mask is not black and white but black and shades of gray, so that the top layer's image areas are only subtlely introduced, blending the two layers into one:
When finished I flattened the image into one layer, which I saved, and here's the finished image once again:
Pretty darn incredible for my first attempt, and with only two very extreme exposures to work with. I can't wait to try this with a properly shot HDR sequence, but for this, I thought I'd push the envelope to see how impressive this Plug-in can be. Oh, if you're shy on Plug-ins, as I once was, these load automatically into Photoshop if you follow the prompts, so they're a snap to load.
Here's the same image
where I used 7 images, covering the exposure gaps that the above example originally had. For this one, however, I ONLY used Efex HDR, and targeted some adjustments in that program. Doing so, it eliminated the need for Photoshop Masks, and was actually a lot easier and faster to use, than the method shown above.
Below, I've illustrated a couple of the points I made above. The long image on the Right is a screen shot of a few of the choices that HDR Efex gives for preset options. On the Left, are the eight images I used for the composite taken at about .6 stops apart. The large image on the bottom is the finished composite -- all NIK HDR Effexs, no Photoshop. I tweaked the results with the menu bar offered inside the filter, and was pleased with the result.
If any of this new, exciting material intrigues you, we'll be teaching this, and more, in two Photoshop Classes this summer. One, our Photoshop 1 - Intro to Photoshop, will cover all the basics that a digital photographer needs to know, as well as exciting plug-ins and accessories like NIK and Helicon Focus. Our other offering, taught by author Ellen Anon, takes Photoshop and your creative photography to the next step, and this program is tailored for those who already have experience with Photoshop but who would like to maximize their image, or their vision's, potential. NIK software will play a big role in this course!
If time permits, I'll also be demonstrating this HDR program to our Digital Complete Nature Photo Course, but we'll be covering so much in this course that I suspect the demo will be limited to just that.
Check out this incredible program for yourself – you can download a free trial by visiting the Nik website.
Gary Farber at Hunt's Photo and Video is offering our readers a special price of $139.99 plus free shipping. Mention the code name Hoothollow. Call Gary at 781 462-2332, or email Gary at digitalguygary@wbhunt.com.
Previous Tips, July 2009 onward
Silver Efex Pro for Black and White Images
Beware the DELL Software Solution Rip Off
How and What We Pack for Trips
Canon Digital Learning Center
The Movie Mode with the Canon Mark IV
Batch Renaming in Bridge and CS5
Alternate Uses of some Bogen Products
Hoodman Products
Using High ISO and Live View for Focusing in Dim Light
Art Print Scams for Hungry Photographers
Hungry Vultures ruin vehicles in the Everglades
Use a Short Lens for Depth of Field
Get Professional Help!
Mini-Molar Bag
Access America Trip Insurance
Bogen Base for Macro Work
Archived Tips of the Month
prior to July 2009
Most of my original Tips of the Month for the last several
years are available through this link. The 'look' is from my
original web site, although if I ever have enough time I might redo these pages to match the new web site But that's not a high priority.